January's Second Project
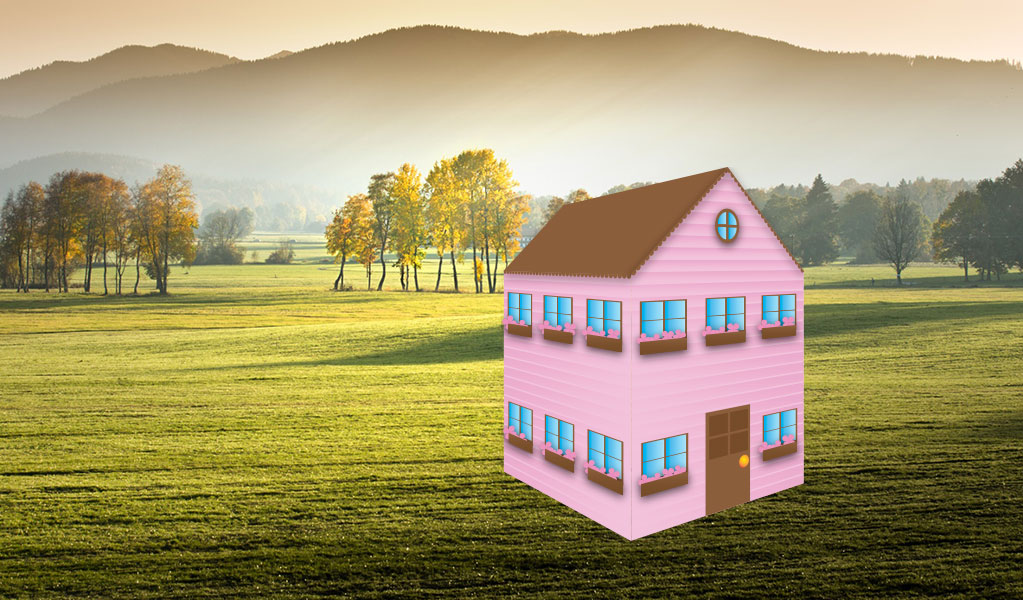
You can think of January’s second project as a portfolio piece to present during job interviews with architecture firms. Your drawing should look similar to the drawings below; except that your drawing will be placed into an actual photograph and made to look like they actually belongs in the photo through the use of Photoshop filters, adjustment layers, and layer blending modes.
Your architectural concept drawing should include three sides – representing the x, y, and z axes of the three-dimensional Cartesian coordinate system – created separately in an Adobe Illustrator document, put together using Illustrator’s Perspective Grid (we will look at how to do this later), and finally placed into a photograph using Adobe Photoshop. In addition to two walls and a roof, we will determine what other items your building should include in class.
Start by creating your house, in Illustrator. First, create a detailed flat (2-D) house. Use grids, rulers, and guides to help you line things up and make them look good.
Don't worry about placing it on the Perspective Grid yet. Your house should look awesome before you place it on the perspective grid.
The first step will be to create the front, one side, and the roof of your building in Illustrator. To insure that we do this in a way that looks consistent, when comparing pieces to each other, we will be using rulers and grids in Illustrator. When you are finished creating the walls and roof, you should add the determined details (we will discuss these in class). Be sure to group each wall and the roof with their respective details (how to group and ungroup objects) when you have finished creating those details.
Once you have completed the two dimensional walls, and roof of your house, you are ready to turn it into a three dimensional house.
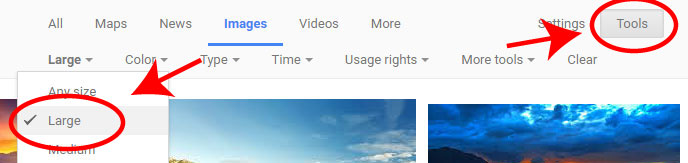
First, get a background picture from the internet. Make sure it is the largest image you can find.
Second, look at the image you have selected, and THINK about how your house should be positioned in that image.
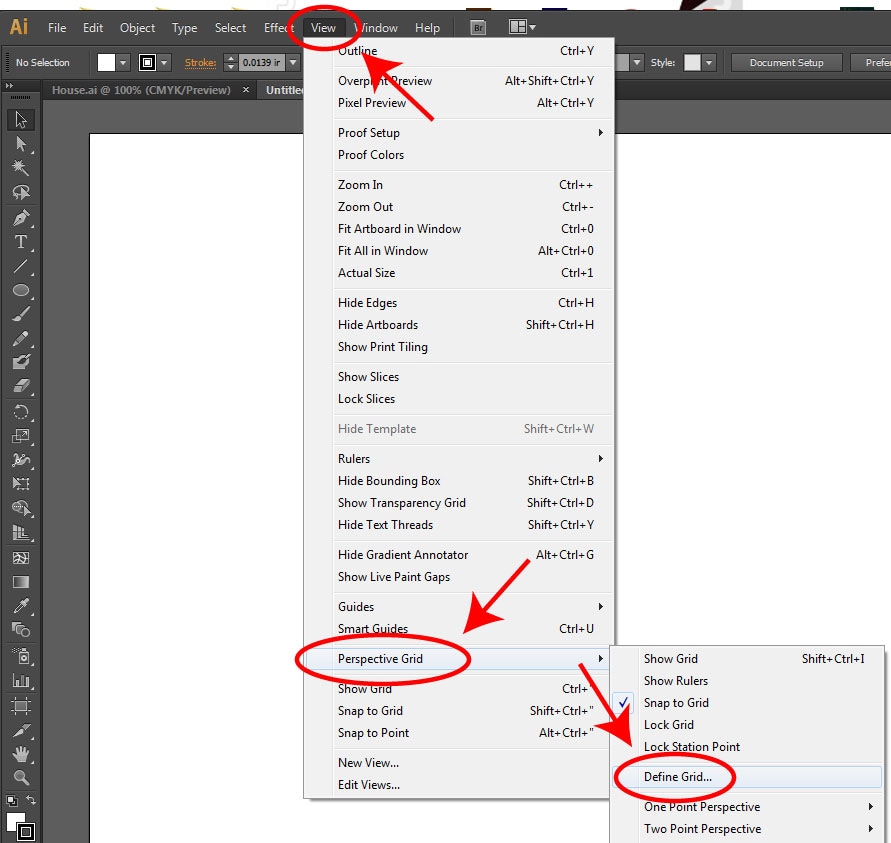
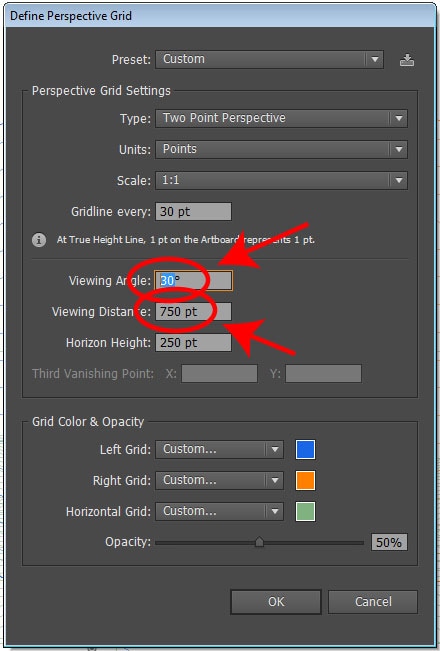
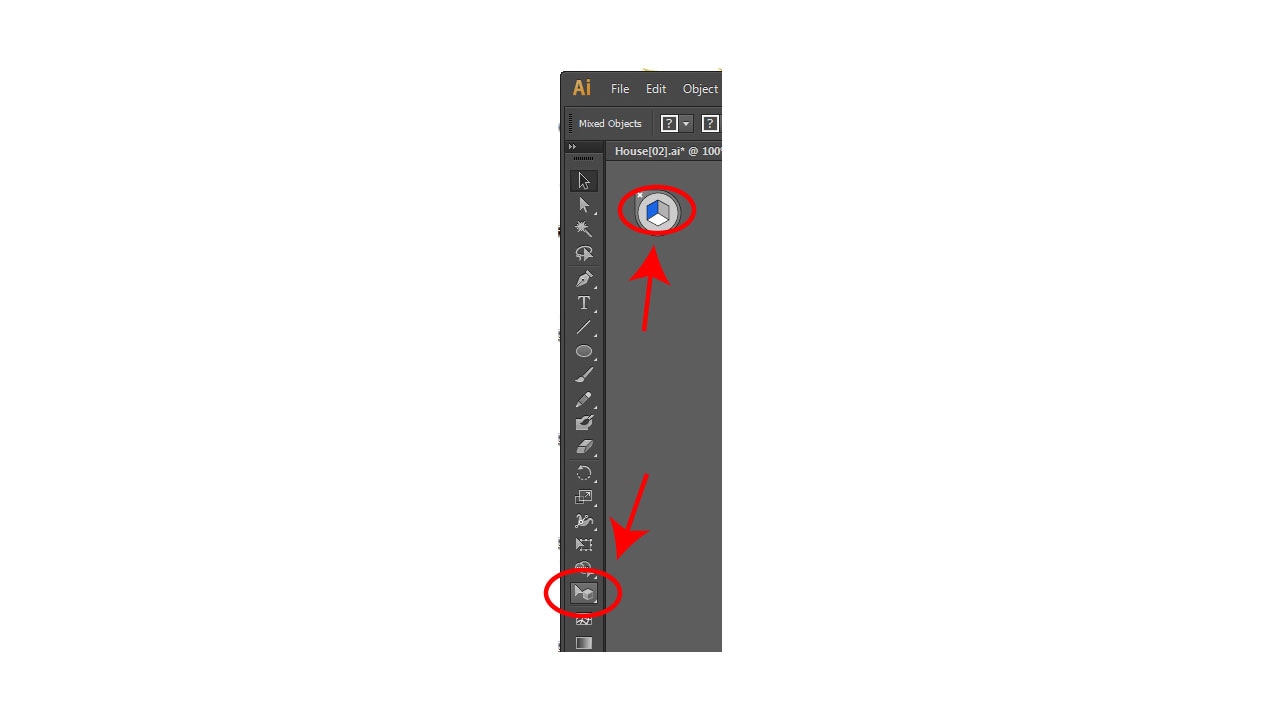
Third, open up your house in Illustrator, turn on the Perspective Grid, and try to make the grid look the way you want your house positioned.
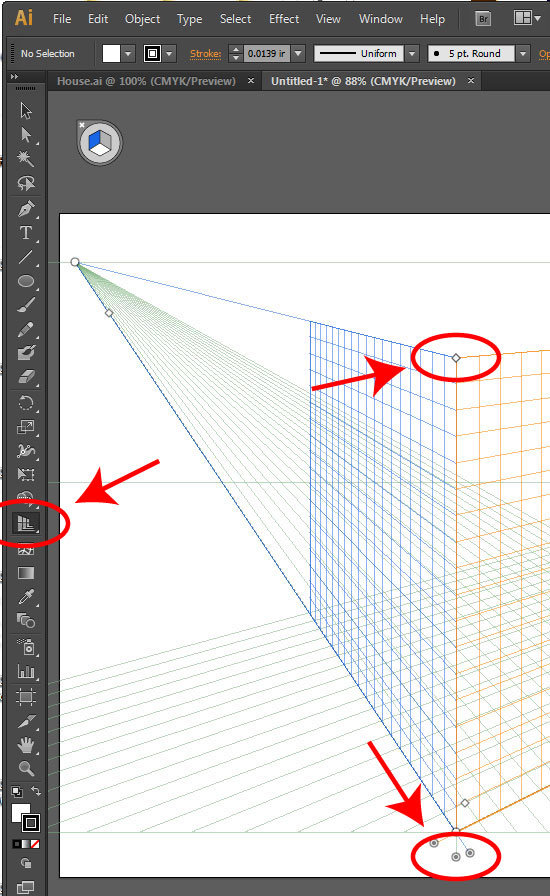
Forth, use the Perspective Selection Tool to position the walls of your house onto the Perspective Grid. When you are satisfied, hide the Perspective Grid, and use the Direct Selection Tool (or Envelope Distort) to position your roof onto your house.
Fifth, select your house using the Selection Tool, and Fit [the Artboard] to [the] Selected Art. Save your Illustrator file, and Place it into a Photoshop document containing your background image.
Sixth, use Layer Masks, Adjustment Layers, Blending Modes, and Effects to make your house look like it belongs in the background image (we will explore this on Friday).
Your architectural concept drawing should include three sides – representing the x, y, and z axes of the three-dimensional Cartesian coordinate system – created separately in an Adobe Illustrator document, put together using Illustrator’s Perspective Grid (we will look at how to do this later), and finally placed into a photograph using Adobe Photoshop. In addition to two walls and a roof, we will determine what other items your building should include in class.
Start by creating your house, in Illustrator. First, create a detailed flat (2-D) house. Use grids, rulers, and guides to help you line things up and make them look good.
Don't worry about placing it on the Perspective Grid yet. Your house should look awesome before you place it on the perspective grid.
The first step will be to create the front, one side, and the roof of your building in Illustrator. To insure that we do this in a way that looks consistent, when comparing pieces to each other, we will be using rulers and grids in Illustrator. When you are finished creating the walls and roof, you should add the determined details (we will discuss these in class). Be sure to group each wall and the roof with their respective details (how to group and ungroup objects) when you have finished creating those details.
Once you have completed the two dimensional walls, and roof of your house, you are ready to turn it into a three dimensional house.
First, get a background picture from the internet. Make sure it is the largest image you can find.
Second, look at the image you have selected, and THINK about how your house should be positioned in that image.
Third, open up your house in Illustrator, turn on the Perspective Grid, and try to make the grid look the way you want your house positioned.
Forth, use the Perspective Selection Tool to position the walls of your house onto the Perspective Grid. When you are satisfied, hide the Perspective Grid, and use the Direct Selection Tool (or Envelope Distort) to position your roof onto your house.
Fifth, select your house using the Selection Tool, and Fit [the Artboard] to [the] Selected Art. Save your Illustrator file, and Place it into a Photoshop document containing your background image.
Sixth, use Layer Masks, Adjustment Layers, Blending Modes, and Effects to make your house look like it belongs in the background image (we will explore this on Friday).


Here's a tutorial for the adventurous. January's second project is not based on this tutorial, but you can see how to create a three-dimensional looking house in Adobe Illustrator.
Vocabulary
Picture plane: the flat surface or plane in which the artist organizes the picture.
Scale (related to proportion): a technique where the artist makes one object larger than another in order to cause the larger object to appear closer to us than the smaller object.
Overlapping: a technique where the artist creates the illusion of depth by placing one object in front of another.
High-low placement: a technique where the artist places an object lower in the picture plane to make it appear closer to us than another object that is placed higher.
Arial perspective: a technique where the artist reduces the detail, and color intensity, as well as shifts the hue of an object toward the blueish end of the visible light spectrum in order to give the illusion of distance.
 RSS Feed
